
Converting the Mantua HO 2-6-6-2T Mallet into a detailed On30 model
 By Dave Wingrove/Photos by the Author
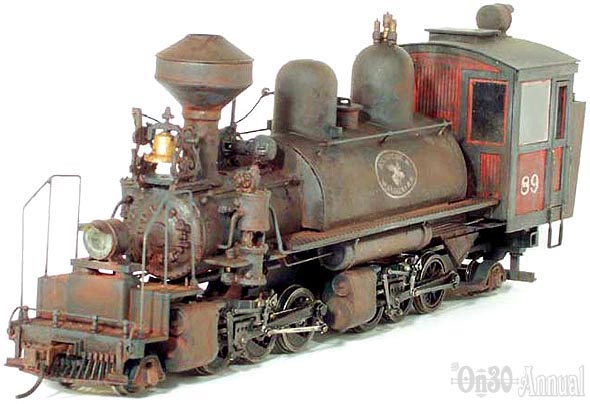
I obtained a Banta Model Works conversion cab for the Mantua 2-6-6-2T. They are very nice and fit the locomotive perfectly. Mine was for the version without a tender but Banta makes both types. You can find these conversion cabs listed on the Banta Model Works web site. I added rivet embossed .010″ styrene panels to the coal bunker of my cab because I wanted the look of steel. I pre-painted the wood panels Special Oxide Red and the other parts Grimy Black. I used .020″ styrene sheet for the roof and carefully wired the rear light through the roof panel into a Precision Scale Models (PSC) headlight casting which I had pre-drilled and pre-painted. I press fit the cab into place for now. Next I cut strips of diamond plate styrene and glued them onto the existing running boards. I felt this would enhance the industrial look of the locomotive.
 For the water tank I cut a 1-1⁄8″ diameter piece of styrene tubing lengthwise in a band saw, fabricated end pieces to fit onto the locomotive boiler, and sheathed it in .010″ rivet embossed styrene sheet material. I used 5 minute epoxy for this as not to warp or damage the surface of the thin sheet with plastic cement.
I used the original Mantua steam dome (the flat one with the valves and whistle) as my water filler cap by making a flat styrene cover for it and fitting it with a wire handle. I shaped this assembly as well as the new PSC Sand and Steam domes by sanding them on a piece of the 11⁄8″ diameter plastic tubing rolled in some fine sandpaper. This process made matching the fit to the water tank easy. I re-used the original HO valves and whistle on my steam dome because they looked sufficiently large enough to me.
 The smoke stack was made by combining the original stack with the top of a Xeodon Designs Climax Balloon stack. The combination provides a beefy industrial looking stack with a nice fit to the smoke-box.
I cut away a little more of the foot-plates with my Dremel tool on both sides of the smokebox to fit the new air pumps and fabricated some simple air pump brackets out of strip styrene. Xeodon air tanks were fitted to the underside of each running board and I plumbed it all together with brass wire.
On the pilot deck I mounted the new PSC O Scale headlight. I removed the HO handrails and used them as a pattern to fabricate new taller hand rails, using an O Scale figure as my guide for appropriate height. I soldered the handrail components together but ACC could be used just as easily. In fact, I had to repair one handrail with ACC because I broke it after installation and I can’t tell the difference now.
I made a simple mounting bracket from styrene and glued it to the smokebox ahead of the smokestack and attached the pre-painted bell with the ornate bracket to it. I attached the generator to the smoke-box behind the stack.

For the finishing details, I attached all the handrail stanchions by drilling holes for them, running the brass wire through them and gluing them in with ACC. I made .020″ wire grab rails for the cab and installed the stirrup steps to the cab. I secured the cab with a little dab of ACC on each side.
Recently a fun technique I have discovered is making my own O scale braided rope. I use the gold colored fine beading wire that can be found in craft stores. Depending on the thickness of the rope desired I use 2, 3, or, 4 strands of wire. I secure them together into the chuck of my battery drill and hold the other ends together with pliers. I turn on the drill and twist the wires all up together nice and tight. The gold color will blacken to a nice deep brown which I think looks good for rope, but it can also be painted with washes for darker colors. I made my bell and whistle ropes on the 2-6-6-2 using this method.
 I brush painted everything except the previously painted parts Grimy Black. I applied my decals for the Bigmoose & Wanakena Railroad that were custom made for me by Joel Brumm. He does these decals on legal sized sheets using your own graphic layout and prints them in white (or other colors) using an ALPS printer. They are excellent quality and easy to use with decal finishing solutions. I use the Micro-Mark decal finishing kit and I am very happy with the results.
I generally prefer to depict my locomotives in an advanced stage of weathering. That’s polite talk for saying rust. There are modelers that have some disdain for this approach to weathering and feel that it is unrealistic. I have to admit that I agree with their reasoning that any operating locomotive would receive dignified level of maintenance. Any self-respecting shop crew would provide this proper maintenance, thus making a very rusty in-service locomotive an unlikely observation. However, as a personal choice, I enjoy the look of a heavily worked and weathered locomotive and in my imaginary world the railroad and its workers are a little on the fringe anyway. The more heavily weathered look, in my opinion, gives the locomotive a great deal of character and symbolizes a level of quiet desperation that appeals to me artistically.
I use a combination of weathering techniques. I like the Rustall weathering system and I use it where I want a heavily used and rusty look as I did with this 2-6-6-2. One needs to be careful not to apply it (unrealistically) to the wooden parts of the locomotive though. For the cab I like to dry-brush some gray stencil-cream paint onto it and blend it onto the surfaces with soft medium sized micro brushes. This is followed by black washes and dull-coat. Finally I apply Bragdon weathering powders to accentuate spots of rust, dust, and grime.
I feel the resulting locomotive is a credible rendition of a narrow gauge 2-6-6-2 mallet and despite the relatively small driver size the overall proportions look appropriate to me.
Also of interest, Backwoods Miniatures has a very nice conversion kit for the Mantua 2-6-6-2 available. There are photos on their website. Using either a kit or homegrown I invite you to create your own backwoods logging behemoth. It can be a relatively easy conversion and should yield you a very satisfying result.
 Mantua 2-6-6-2 with Tender Conversion
It has been well over a year since I did the first conversion on the Mantua 2-6-6-2. I did not appreciate at the time how lucky I was to have received one of those locomotives in Model Power’s first run of them. In the interim they have been pretty scarce and last fall I was fortunate enough to obtain the new tender version from Crusader Rail Services while at Allen Littlefield’s Mid Hudson On30 Meet near New Paltz, N.Y. I had not planned on converting one of these but the opportunity, as usual, proved to be irresistible to me.
 This model has nice piping and handrail detail alongside the boiler, which I decided to keep in my conversion. Once again I relied on the Banta Model Works conversion cab as it is a convenient perfect fit. I to do) and I decided to build it up with a cut down Bachmann mogul spent a great deal of time on the pilot because initially I had fabricated tender box. I cut the tender and took a little less than half an inch out a much larger structure which ultimately I decided was too large for the of it to shorten it. When I did this I had a little oops with the razor saw locomotive. I removed most of the original pilot under-structure and and my cut was uneven on one side. No problem, if you have a hole in the water tank you can slap a patch on it. I created the patch from thin styrene which I had applied rivets into with my pounce wheel. Sometimes an accident and the resulting work-around you need to do to save your model creates more interest than if it had all worked out perfectly to begin with. Of course I could have lied to you and told you that I had planned this patch from the start but I am being honest about it to illustrate the value of the “happy accident”.
 I had to do a little trimming on the Mantua tender structure to make it fit right and then I built up a wooden deck from styrene and added the tender box to it. I was careful to maintain the same deck level as the original tender because the loco is equipped with a nice fold down connecting apron detail. The original plug that connects the tender to the locomotive and the trucks were not modified in any way. For DCC applications there is a plug that fits inside the an HO model I often have something in mind for the steam and sand domes, and the smoke stack, but just as often I pull out whatever parts I have on hand and just place them on the boiler and see how they look. I decided on using the Bachmann domes I had left over from backdating a mogul as well as the left-over stack from a Bachmann outside-frame 2-8-0. I added the PSC air pump, on a styrene frame to the side of the smoke-box and plumbed it into the existing piping.
 Probably the most difficult and time consuming aspect of this project is converting the tender. I needed to use the existing tender sub-structure because the locomotive depends on it to run properly, (at least not without doing some rewiring which I was not inclined tender. I added some greedy boards up top with a hand cut wood load and applied my Bigmoose & Wanakena decals.
The rear headlight is a Bachmann mogul headlight without its frame and the front headlight is a resin casting that was given to me by friend and fellow modeler Don Kralik. These were equipped with lamps and soldered right into the existing wiring. The paint, weathering are the identical techniques as I described earlier with the non-tender version.
I fabricated my cab roof from styrene and made it removable. I may want to revisit this project someday and add a lot of back-head detail and figures.
I think I may like this conversion more than my original 2-6-6-2. I have heard that the new Mantua 2-6-6-2 locomotives are now increasingly available and the opportunity for you to convert one of either type to On30 may be as irresistible to you as it was for me.
